Apollo 9
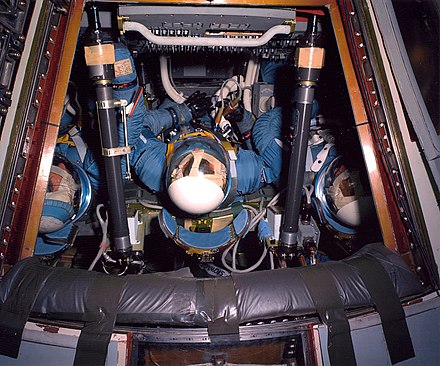
 David Scott performs a standup EVA from Command Module Gumdrop, seen from docked Lunar Module Spider | |
| Mission type | Lunar module test flight |
|---|---|
| Operator | NASA |
| COSPAR ID | |
| SATCAT no. |
|
| Mission duration | 10 days, 1 hour, 54 seconds[2] |
| Orbits completed | 151[3] |
| Spacecraft properties | |
| Spacecraft |
|
| Manufacturer |
|
| Launch mass | 95,231 pounds (43,196 kg)[4] |
| Landing mass | 11,094 pounds (5,032 kg) |
| Crew | |
| Crew size | 3 |
| Members | |
| Callsign |
|
| EVAs | 1 |
| EVA duration | 77 minutes |
| Start of mission | |
| Launch date | March 3, 1969, 16:00:00 UTC |
| Rocket | Saturn V SA-504 |
| Launch site | Kennedy LC-39A |
| End of mission | |
| Recovered by | USS Guadalcanal |
| Decay date | October 23, 1981 (LM ascent stage) |
| Landing date | March 13, 1969, 17:00:54 UTC |
| Landing site | North Atlantic Ocean 23°15′N 67°56′W / 23.250°N 67.933°W |
| Orbital parameters | |
| Reference system | Geocentric |
| Regime | Low Earth orbit |
| Perigee altitude | 127 miles (204 km) |
| Apogee altitude | 309 miles (497 km) |
| Inclination | 33.8 degrees |
| Period | 91.55 minutes |
| Epoch | March 5, 1969[5] |
| Docking with LM | |
| Docking date | March 3, 1969, 19:01:59 UTC |
| Undocking date | March 7, 1969, 12:39:06 UTC |
| Docking with LM Ascent Stage | |
| Docking date | March 7, 1969, 19:02:26 UTC |
| Undocking date | March 7, 1969, 21:22:45 UTC |

 Left to right: McDivitt, Scott, Schweickart | |
Apollo 9 was the third crewed mission in the United States Apollo space program, the second to be sent into orbit by a Saturn V rocket, and the first flight of the full Apollo spacecraft: the command and service module (CSM) with the Lunar Module (LM). Flown in Low Earth Orbit, its major purposes were to qualify the LM for lunar orbit operations and to show that it and the CSM could separate and move well apart, before rendezvousing and docking again, as they would have to do on subsequent lunar landing missions.
The three-person crew consisted of Commander James McDivitt, Command Module Pilot David Scott, and Lunar Module Pilot Rusty Schweickart. During the ten-day mission, they tested systems and procedures critical to landing on the Moon, including the LM engines, backpack life support systems, navigation systems, and docking maneuvers.
After launching on March 3, 1969, the crew performed the first crewed flight of a LM, the first docking and extraction of a LM, one two-person spacewalk (EVA), and the second docking of two crewed spacecraft—two months after the Soviets performed a spacewalk crew transfer between Soyuz 4 and Soyuz 5. The mission concluded on March 13 and was a full success. It proved the LM worthy of crewed spaceflight, thus setting the stage for the dress rehearsal for the lunar landing, Apollo 10, before the ultimate goal, landing on the Moon.
Mission background
In April 1966, McDivitt, Scott and Schweickart were selected by Director of Flight Crew Operations Deke Slayton as the second Apollo crew. Their initial job was as backup to the first Apollo crew to be chosen, Gus Grissom, Ed White and Roger Chaffee, for the first crewed Earth orbital test flight of the block I command and service module,[6] designated AS-204. But delays in the block I CSM development pushed AS-204 into 1967. The revised plan had the McDivitt crew scheduled for the second crewed CSM, which was to rendezvous in Earth orbit with an uncrewed LM, launched separately. The third crewed mission, to be commanded by Frank Borman, was to be the first launch of a Saturn V with a crew.[7]
On January 27, 1967, Grissom's crew was conducting a launch-pad test for their planned February 21 mission, which they named Apollo 1, when a fire broke out in the cabin, killing all three men.[8] A complete safety review of the Apollo program followed.[9] During this time, Apollo 5, an uncrewed launch to test the first lunar module (LM-1) took place.[10]
Under the new schedule, the first Apollo crewed mission to go into space would be Apollo 7, planned for October 1968. This mission, which was to test the block II command module, did not include a lunar module.[11] In 1967, NASA had adopted a series of lettered missions leading up to the crewed lunar landing, the "G mission", with completion of one a prerequisite to the next.[12] Apollo 7 would be the "C mission", but the "D mission" required testing of the crewed lunar module, which was running well behind schedule and endangering John F. Kennedy's goal of people walking on the Moon and returning safely to Earth by the end of the 1960s.[13][14] McDivitt's crew had been announced by NASA in November 1967 as prime crew for the D mission, lengthy testing of the command and lunar modules in Earth orbit.[15]
Seeking to keep Kennedy's goal on schedule, in August 1968, Apollo Program Manager George M. Low proposed that if Apollo 7 in October went well, that Apollo 8 go to lunar orbit without a LM. Until then, Apollo 8 was the D mission with Apollo 9 the "E mission", testing in medium Earth orbit.[12][14][16] After NASA approved sending Apollo 8 to the Moon, while making Apollo 9 the D mission, Slayton offered McDivitt the opportunity to stay with Apollo 8 and thus go to lunar orbit. McDivitt turned it down on behalf of his crew, preferring to stay with the D mission, now Apollo 9.[17][18]
Apollo 7 went well, and the crews were switched.[19] The crew swap also affected who would be the first astronauts to land on the Moon, for when the crews for Apollo 8 and 9 were swapped, their backup crews were also traded. Since the rule of thumb was for backup crews to fly as prime crew three missions later, this put Neil Armstrong's crew (Borman's backup) in position to make the first landing attempt on Apollo 11 instead of Pete Conrad's crew,[20] who made the second landing on Apollo 12.[21]
Framework
Crew and key Mission Control personnel
| Position[22] | Astronaut | |
|---|---|---|
| Commander | James A. McDivitt Second and last spaceflight | |
| Command Module Pilot (CMP) | David R. Scott Second spaceflight | |
| Lunar Module Pilot (LMP) | Russell L. Schweickart Only spaceflight | |
McDivitt was born June 10, 1929 in Chicago. He received a Bachelor of Science degree from the University of Michigan in 1951. That year, he joined the Air Force, flying 145 combat missions over Korea. Selected as a member of the second group of astronauts in 1962, McDivitt was command pilot of Gemini 4 (1965).[23] Scott, born June 6, 1932 in San Antonio, Texas, earned a Bachelor of Science degree from the United States Military Academy at West Point,[24] and later received two advanced degrees from MIT.[25] Selected as a Group 3 astronaut in 1963, he flew alongside Neil Armstrong in Gemini 8.[26] Schweickart was born October 25, 1935 in Neptune, New Jersey. He received undergraduate and graduate degrees in aeronautics from MIT, and served in the Air Force and Air National Guard from 1956 to 1963, when he was selected as a Group 3 astronaut.[27]

The backup crew consisted of Conrad as commander, Command Module Pilot Richard F. Gordon Jr. and Lunar Module Pilot Alan L. Bean. Originally, the backup lunar module pilot was Clifton C. Williams Jr., who was killed in October 1967 when the T-38 he was flying crashed near Tallahassee.[15] When forming his crew, Conrad had wanted Bean, a former student of his at the United States Naval Test Pilot School at Patuxent River NAS, Maryland, but had been told by Slayton that Bean was unavailable due to an assignment to the Apollo Applications Program. After Williams's death, Conrad asked for Bean again and this time Slayton yielded.[28] The support crew for Apollo 9 consisted of Stuart A. Roosa, Jack R. Lousma, Edgar D. Mitchell and Alfred M. Worden. Lousma was not an original member of the Apollo 9 support crew, but was assigned after Fred W. Haise Jr. was moved to the position of backup lunar module pilot on Apollo 8—several astronauts were shifted in the wake of Michael Collins being removed from the Apollo 8 prime crew because of treatment for bone spurs.[15][29]
The flight directors were Gene Kranz, first shift, Gerry Griffin, second shift and Pete Frank, third shift. Capsule communicators were Conrad, Gordon, Bean, Worden, Roosa and Ronald Evans.[30]
Mission insignia

The circular patch shows a drawing of a Saturn V rocket with the letters USA on it. To its right, an Apollo CSM is shown next to an LM, with the CSM's nose pointed at the "front door" of the LM rather than at its top docking port. The CSM is trailing rocket fire in a circle. The crew's names are along the top edge of the circle, with APOLLO IX at the bottom. The "D" in McDivitt's name is filled with red to mark that this was the "D mission" in the alphabetic sequence of Apollo missions. The patch was designed by Allen Stevens of Rockwell International.[31]
Planning and training
Apollo 9's main purpose was to qualify the LM for crewed lunar flight, demonstrating, among other things, that it could perform the maneuvers in space that would be needed for a lunar landing, including docking with the CSM.[32] Having worked together since January 1966, at first as backups for Apollo 1, and having always had the assignment of flying the LM, McDivitt's crew was among the best trained ever to fly. Flight Director Gene Kranz deemed the Apollo 9 crew the best prepared for their mission, and felt Scott was an extremely knowledgeable CMP.[33] Crew members underwent some 1,800 hours of mission-specific training, about seven hours for every hour they would spend in flight. They took part in the vehicle checkouts for the CSM at North American Rockwell's facility in Downey, California and for the LM at Grumman's plant in Bethpage, New York. They also participated in testing of the modules at the launch site.[34]
Among the types of the training which the crew underwent were simulations of zero-G, both underwater, and in the Vomit Comet. During these exercises, they practiced for the planned extravehicular activities. They traveled to Cambridge, Massachusetts for training on the Apollo Guidance Computer (AGC) at MIT. The crew studied the sky at the Morehead Planetarium and at the Griffith Planetarium, especially focusing on the 37 stars used by the AGC. They each spent more than 300 hours in the CM and LM simulators at Kennedy Space Center (KSC) and at Houston, with some involving live participation by Mission Control. Additional time was spent in other simulators in various locations.[35]

The first mission to use the CSM, the LM and a Saturn V, Apollo 9 allowed the launch preparations team at KSC its first opportunity to simulate the launch of a lunar landing mission. The LM arrived from Grumman in June 1968 and was subjected to extensive testing including in the altitude chamber, simulating space conditions. As this occurred, other technicians assembled the Saturn V inside the Vehicle Assembly Building. The CM and SM arrived in October, but even the experienced KSC team from North American had trouble joining them together. When the lander was done with the altitude chamber, the CSM took its place, letting the LM be available for installation of equipment such as rendezvous radar and antennas. There were no lengthy delays, and on January 3, 1969, the launch vehicle was taken out of the VAB and moved to Launch Complex 39A by crawler. Flight readiness reviews for the CM, the LM and the Saturn V were held and passed in the following weeks.[36]
Hardware
Launch vehicle
The Saturn V (AS-504) used on Apollo 9 was the fourth to be flown, the second to carry astronauts to space,[37] and the first to bear a lunar module. Although similar in configuration to the Saturn V used on Apollo 8, a number of changes were made. The inner core of the F-1 engine chamber in the first (S-IC) stage was removed, thus saving weight and allowing for a slight increase in specific impulse. Weight was also saved by replacing the skins of the liquid oxygen tanks with lighter ones, and by providing lighter versions of other components. Efficiency was increased in the S-II second stage with uprated J-2 engines, and through a closed-loop propellant utilization system rather than Apollo 8's open-loop system.[38] Of the 3,250 pounds (1,470 kg) weight reduction in the second stage, about half came from a 16 percent reduction in the thickness of the tank side walls.[39]
Spacecraft and call signs

Apollo 9 used CSM-104, the third block II CSM to be flown with astronauts aboard. Apollo 8, lacking a LM, did not have docking equipment; Apollo 9 flew the probe-and-drogue assembly used for docking along with other equipment added near the forward hatch of the CM; this allowed for rigid docking of the two craft, and for internal transfer between CM and LM.[40] Had the switch in missions between Apollo 8 and 9 not occurred, the Earth-orbit mission would have flown CSM-103, which flew on Apollo 8.[41]
The Earth-orbit mission was originally supposed to use LM-2 as its lunar module, but the crew found numerous flaws in it, many associated with it being the first flight-ready lunar module off Grumman's production line. The delay occasioned by the switch in missions allowed LM-3 to be available, a machine the crew found far superior.[42] Neither LM-2 nor LM-3 could have been sent to the Moon as both were too heavy; Grumman's weight reduction program for the LMs only became fully effective with LM-5, designated for Apollo 11.[43] Small cracks in LM-3's aluminum alloy structure due to stresses such as the insertion of a rivet proved an ongoing issue; Grumman's engineers continued working to fix them until the LM had to be mounted on the Saturn V in December 1968.[44] LM-2 never flew in space and is in the National Air and Space Museum.[45]

After the Gemini 3 craft was dubbed Molly Brown by its crew, Grissom and John Young, NASA forbade naming spacecraft. The fact that during the Apollo 9 mission, the CSM and LM would separate and need different call signs caused the Apollo 9 astronauts to push for a change. In simulations, they began to refer to the CSM as "Gumdrop", a name inspired by the CM's appearance while in the blue protective wrapping in which it was transported from the manufacturer, and the LM as "Spider", inspired by the LM's appearance with landing legs deployed. NASA public relations could not argue the names were inappropriate, and the call signs gained official sanction.[46]
Life Support System backpack

The Extravehicular Mobility Unit (EMU) backpack flew for the first time on Apollo 9, used by Schweickart during his EVA.[47] This included the Portable Life Support System (PLSS), providing oxygen to the astronaut and water for the Liquid Cooling Garment (LCG), which helped prevent overheating during extravehicular activity.[48] Also present was the Oxygen Purge System (OPS), the "bedroll" atop the backpack, which could provide oxygen for up to roughly an hour if the PLSS failed.[49] A more advanced EMU was used for the lunar landing on Apollo 11.[49]
During his stand-up EVA, Scott did not wear a PLSS, but was connected to the CM's life support systems through an umbilical, utilizing a Pressure Control Valve (PCV). This device had been created in 1967 to allow for stand-up EVAs from the hatches of the LM or CM, or for brief ventures outside. It was later used by Scott for his lunar surface stand-up EVA on Apollo 15, and for the deep-space EVAs by the command module pilots of the final three Apollo flights.[50]
Mission highlights
First through fifth days (March 3–7)

Originally scheduled to launch on February 28, 1969, the liftoff of Apollo 9 was postponed because all three astronauts had colds, and NASA did not want to take the risk that the mission might be affected. Around-the-clock labor shifts were required to keep the spacecraft in readiness; the delay cost $500,000.[51] The rocket launched from KSC at 11:00:00 EST (16:00:00 GMT) on March 3.[52] This was well within the launch window, which would have remained open for another three and a quarter hours.[30] Present in the firing control room was Vice President Spiro Agnew on behalf of the new Nixon administration.[53]
McDivitt reported a smooth ride during the launch, although there was some vibration and the astronauts were surprised to be pushed forward when the Saturn V's first stage stopped firing, before its second stage took over, when they were pushed back into their couches,[53] Each of the first two stages slightly underperformed; a deficiency made up, more or less, by the S-IVB third stage.[54] Once that third stage cut out at 00:11:04.7 into the mission,[55] Apollo 9 entered a parking orbit of 102.3 by 103.9 miles.[52]
The crew began their first major orbital task with the separation of the CSM from the S-IVB at 02:41:16 into the mission, seeking to turn around and then dock with the LM, which was on the end of the S-IVB, after which the combined spacecraft would separate from the rocket. If it was not possible to make such a docking, the lunar landing could not take place. It was Scott's responsibility to fly the CSM, which he did to a successful docking, as the probe and drogue docking assembly worked properly. After McDivitt and Schweickart inspected the tunnel connecting the CM and LM, the assembled spacecraft separated from the S-IVB. The next task was to demonstrate that two docked spacecraft could be maneuvered by one engine. The five-second burn took place at 5:59.01.1 into the mission, after which Scott excitedly reported the LM was still in place. Thereafter, the S-IVB was fired again, and the stage was sent into solar orbit.[53][55]

From 09:00:00 to 19:30:00, a sleep period was scheduled.[56] The astronauts slept well, but complained of being woken by non-English transmissions, possibly in Chinese. The highlight of the second day in orbit (March 4) was three burns of the SM's Service Propulsion System (SPS).[57] The initial burn, at 22:12:04.1,[55] lasted 110 seconds,[57] and including swiveling or "gimbaling" the engine to test whether the autopilot could dampen the induced oscillations, which it did within five seconds. Two more SPS burns followed, lightening the SM's fuel load.[53] The spacecraft and engine passed every test, sometimes proving more robust than expected.[58] The performance of the CSM in remaining stable while the engine was being gimbaled would in 1972 help cause McDivitt, by then Apollo Program Manager, to approve the continuation of Apollo 16 when its CSM was experiencing an unstable gimbal after separation from its LM in lunar orbit.[59]
The flight plan for the third day in space was to have the commander and lunar module pilot enter the LM to check out its systems and use its descent engine to move the entire spacecraft.[60] The descent engine was the backup to the SPS; the ability to use it in this manner would prove critical on Apollo 13.[61] The flight plan was thrown into question when Schweickart vomited, suffering from space adaptation sickness and McDivitt felt queasy as well. They had been avoiding sudden physical motions, but the contortion-like maneuvers to don their space suits for the LM checkout caused them to feel ill. The experience would teach the doctors enough about the sickness to have the astronauts avoid it on the lunar landings, but at the time Schweickart feared his vomiting might endanger Kennedy's goal. They were well enough to continue with the day's plan, and entered the LM, thus transferring between vehicles for the first time in the US space program, and making the first ever transfer without needing to spacewalk, as Soviet cosmonauts had. The hatches were closed, though the modules remained docked, showing that Spider's communications and life support systems would work in isolation from those of Gumdrop. On command, the landing legs sprang into the position they would assume for landing on the Moon.[62]
In the LM, Schweickart vomited again, causing McDivitt to request a private channel to the doctors in Houston. The first episode had not been reported to the ground because of its brief nature, and when the media learned what had happened to Schweickart, there were "repercussions and a spate of unfriendly stories".[53] They finished the LM checkout, including the successful firing of the descent engine, and returned to Scott in Gumdrop.[53] The burn lasted 367 seconds and simulated the throttle pattern to be used during the landing on the Moon.[2] After they returned, a fifth firing of the SPS was made, designed to circularize Apollo 9's orbit in preparation for the rendezvous.[63] This took place at 54:26:12.3,[55] raising the craft's orbit to 142 by 149 miles.[2]
The fourth day's program (March 6) was for Schweickart to exit the hatch on the LM and make his way along the outside of the spacecraft to the CM's hatch, where Scott would stand by to assist, demonstrating that this could be done in the event of an emergency. Schweickart was to wear the life support backpack, or PLSS, to be worn on the lunar surface EVAS.[64] This was the only EVA scheduled prior to the lunar landing, and thus the only opportunity to test the PLSS in space. McDivitt initially cancelled the EVA due to Schweickart's condition, but with the lunar module pilot feeling better, decided to allow him to exit the LM, and once he was there, to move around the LM's exterior using handholds. Scott stood in the CM's hatch; both men retrieved experiments from the exterior of their vehicles. Schweickart found moving around easier than it had been in simulations; both he and Scott were confident that Schweickart could have completed the exterior transfer if called upon to do so, but considered it unnecessary.[53][65] During the EVA, Schweickart used the call sign "Red Rover", a nod to the color of his hair.[66]

On March 7, the fifth day, came "the key event of the entire mission: the separation and rendezvous of the lunar module and the command module".[53] The lunar module lacked the capability to return the astronauts to Earth;[43] this was the first time space travelers had flown in a vehicle that could not take them home.[66] McDivitt and Schweickart entered the LM early, having obtained permission to do so without wearing their helmets and gloves, making it easier to set up the LM.[53] When Scott in Gumdrop pushed the button to release the LM, it initially hung on the latches at the end of the docking probe, but he hit the button again and Spider was released.[67] After spending about 45 minutes near Gumdrop, Spider went into a slightly higher orbit, meaning that over time, the two craft would separate, with Gumdrop ahead.[53] Over the next hours, McDivitt fired the LM's descent engine at various throttle settings; by the end of the day the LM was thoroughly test-flown.[68] At a distance of 115 miles (185 km), Spider fired to lower its orbit and thus begin to catch up with Gumdrop, a process that would take over two hours, and the descent stage was jettisoned.[53]
The approach and rendezvous were conducted as near as possible to what was planned for the lunar missions. In order to show that rendezvous could be performed by either craft, Spider was the active party during the maneuver.[69] McDivitt brought Spider close to Gumdrop, then maneuvered the LM to show each side to Scott, allowing him to inspect for any damage. Then, McDivitt docked the craft.[53] Due to glare from the Sun, he had trouble doing this and Scott guided him in. During the later missions, the job of docking the two spacecraft in lunar orbit would fall to the command module pilot.[70] After McDivitt and Schweickart returned to Gumdrop, Spider was jettisoned, its engine fired to fuel depletion remotely by Mission Control as part of further testing of the engine,[2][53] simulating an ascent stage's climb from the lunar surface. This raised Spider to an orbit with apogee of over 4,300 miles (6,900 km). NASA officials predicted that Spider would remain in orbit for 18 years.[71] The only major lunar module system not fully tested was the landing radar, as this could not be done in Earth orbit.[72]
Sixth through eleventh days (March 8–13)

Apollo 9 was to remain in space for about ten days to check how the CSM would perform over the period of time required for a lunar mission.[70] Most major events had been scheduled for the first days so that they would be accomplished if the flight needed to be ended early.[73] The remaining days in orbit were to be conducted at a more leisurely pace.[74] With the main goals of the mission accomplished, the hatch window was used for special photography of Earth, using four identical Hasselblad cameras, coupled together and using film sensitive to different parts of the electromagnetic spectrum.[75] Such photography allowed different features of the Earth's surface to appear, for example, tracking of water pollution as it exits mouths of rivers into the sea,[51] and the highlighting of agricultural areas using infrared.[75] The camera system was a prototype, and would pave the way for the Earth Resources Technology Satellite, predecessor to the Landsat series.[76] The photography was successful, as the ample time in orbit meant that the crew could wait to allow cloud cover to pass, and would inform Skylab's mission planning.[3]
Scott used a sextant to track landmarks on the Earth, and turned the instrument to the skies to observe the planet Jupiter, practicing navigation techniques that were to be used on later missions.[77] The crew was able to track the Pegasus 3 satellite (launched in 1965) as well as the ascent stage of Spider.[3] The sixth burn of the SPS engine took place on the sixth day, though it was postponed one orbit as the reaction control system (RCS) thruster burn needed to settle the reactants in their tanks was not properly programmed. The SPS burn lowered the perigee of Apollo 9's orbit,[32] allowing for improved RCS thruster deorbit capability as a backup to the SPS.[78]

Considerable testing of the CSM took place, but this was principally Scott's responsibility, allowing McDivitt and Schweickart leisure to observe the Earth; they alerted Scott if anything particularly noteworthy was upcoming, letting him leave his work for a moment to look at Earth too.[79] The seventh burn of the SPS system took place on the eighth day, March 10, its purpose was again to aid RCS deorbit capability, as well as extending Gumdrop's orbital lifetime. It shifted the apogee of the orbit to the Southern Hemisphere, allowing for a longer free-fall time to entry when Apollo 9 returned to Earth. The burn was extended to allow for testing of the propellent gaging system, which had been behaving anomalously during earlier SPS burns.[32][80] Once it was accomplished, Apollo 9's RCS thrusters could have returned it to Earth and still allowed it to land in the primary recovery zone had the SPS engine failed. The eighth and final SPS burn, to return the vehicle to Earth, was accomplished on March 13, less than an hour after the ten-day mark of the mission, after which the service module was jettisoned. The landing was delayed one orbit because of unfavorable weather in the primary landing zone[81] some 250 miles (400 km) ESE of Bermuda.[82] Instead, Apollo 9 splashed down 180 miles (290 km) east of the Bahamas, about 3 miles (4.8 km) from the recovery carrier, the USS Guadalcanal,[83] after a mission lasting 10 days, 1 hour, 54 minutes.[84] Apollo 9 was the last spacecraft to splash down in the Atlantic Ocean until the Crew Dragon Demo-1 mission in 2019.[85]
Hardware disposition

The Apollo 9 Command Module Gumdrop (1969-018A) is on display at the San Diego Air & Space Museum.[86] Gumdrop was formerly displayed at the Michigan Space and Science Center, Jackson, Michigan, until April 2004 when the center closed.[87] The service module, jettisoned shortly after the deorbit burn, reentered the atmosphere.[82]
The ascent stage of LM-3 Spider (1969-018C) reentered on October 23, 1981.[88] The descent stage of LM-3 Spider (1969-018D) reentered on March 22, 1969.[88] The S-IVB (1969-018B) was sent into solar orbit, with initial aphelion of 80,093,617 miles (128,898,182 km), perihelion of 44,832,845 miles (72,151,470 km) and orbital period of 245 days.[89] It remains in solar orbit as of 2019[update].[90]
Appraisal and aftermath

Apollo 9 was deemed an unqualified success. NASA Associate Administrator George Mueller described it, "Apollo 9 was as successful a flight as any of us could ever wish for, as well as being as successful as any of us have ever seen."[83] Gene Kranz called Apollo 9 "sheer exhilaration".[83] Apollo Program Director Samuel C. Phillips stated, "in every way, it has exceeded even our most optimistic expectations."[71] Apollo 11 astronaut Buzz Aldrin stood in Mission Control as Spider and Gumdrop docked after their separate flights, and with the docking, "Apollo 9 had fulfilled all its major objectives. At that moment, Aldrin knew that Apollo 10 would also succeed, and that he and Armstrong would attempt to land on the Moon. On March 24, NASA made it official."[91]
Although he might have been offered command of an Apollo lunar landing mission, McDivitt chose to leave the Astronaut Corps after Apollo 9, becoming Apollo Program Manager later in 1969. Scott was soon given another spaceflight assignment as backup commander of Apollo 12, and then was made mission commander of Apollo 15, landing on the Moon in 1971. Schweickart volunteered for medical investigation of his spacesickness, but was unable to shake its stigma, and was never again assigned to a prime crew. He took a leave of absence from NASA in 1977 that eventually became permanent.[92] Eugene Cernan, commander of Apollo 17, stated that when it came to understanding spacesickness, Schweickart "paid the price for them all".[93]
In the giddiness following the success of Apollo 9, NASA did not conduct the "E mission" (further testing in medium Earth orbit), and even considered skipping the "F mission", the dress rehearsal for the lunar landing, going straight to the landing attempt. As the spacecraft designated for the first landing attempt were still being assembled, this was not done.[94] NASA officials also felt that given the past difficulties with the LM, there was a need for a further test flight before the actual landing attempt, and that orbiting the Moon would give them the opportunity to study mass concentrations there, which had affected Apollo 8's orbit.[95] According to French and Burgess in their study of the Apollo Program, "In any event, ... Apollo 9's success had ensured that the next Apollo mission would go back to the moon."[94]
See also
References
- ^ a b c Orloff & Harland, p. 227.
- ^ a b c d "Apollo 9". NASA. July 8, 2009. Retrieved April 2, 2019.
- ^ a b c Orloff & Harland, p. 230.
- ^ Ezell 1988, Table 2-37: "Apollo 9 Characteristics".
- ^ McDowell, Jonathan. "SATCAT". Jonathan's Space Pages. Retrieved March 23, 2014.
- ^ "'Open End' Orbit Planned for Apollo". The Pittsburgh Press. Pittsburgh, PA. United Press International. August 4, 1966. p. 20. Retrieved November 11, 2010 – via Google News.
- ^ Brooks, et al. 1979, Chapter 8.7: "Preparations for the first manned Apollo mission"
- ^ Chaikin, pp. 12–18.
- ^ Scott & Leonov, pp. 193–195.
- ^ "Apollo 5 (AS-204)". NASA Space Science Data Coordinated Archive. NASA. Retrieved April 26, 2019.
- ^ "Apollo 7 (AS-205)". National Air and Space Museum. Retrieved April 26, 2019.
- ^ a b Ertel, Roland, & Brooks 1975, Part 2(D): "Recovery, Spacecraft Redefinition, and First Manned Apollo Flight".
- ^ Chaikin, pp. 56–57.
- ^ a b Brooks, et al. 1979, Chapter 11.2: "Proposal for a lunar orbit mission"
- ^ a b c Brooks, et al. 1979, Chapter 11.3: "Selecting and training crews"
- ^ French & Burgess, pp. 298–299.
- ^ French & Burgess, pp. 328–329.
- ^ Chaikin, pp. 62, 141.
- ^ Chaikin, pp. 76–77.
- ^ Chaikin, pp. 136–137.
- ^ Chaikin, p. 597.
- ^ "Apollo 9 Crew". National Air and Space Museum. Retrieved May 10, 2015.
- ^ Press Kit, pp. 94–95.
- ^ Press Kit, p. 96.
- ^ Jones, Eric M., ed. (1996). "Apollo 15 crew information". Apollo 15 Lunar Surface Journal. NASA. Archived from the original on November 28, 2016. Retrieved September 4, 2018.
{{cite web}}: Unknown parameter|dead-url=ignored (|url-status=suggested) (help) - ^ Press Kit, pp. 96–97.
- ^ Press Kit, p. 98.
- ^ Chaikin, pp. 245–248.
- ^ Woods, David; Vignaux, Andrew. "Preparations for Launch". Apollo Flight Journal. NASA. Retrieved December 29, 2017.
- ^ a b Orloff & Harland, p. 224.
- ^ Hengeveld, Ed (May 20, 2008). "The man behind the Moon mission patches". collectSPACE. Retrieved July 18, 2009. "A version of this article was published concurrently in the British Interplanetary Society's Spaceflight magazine."
- ^ a b c Mission Report, p. 3-2.
- ^ French & Burgess, p. 330.
- ^ Press Kit, p. 83.
- ^ Press Kit, pp. 83–84.
- ^ Brooks, et al. 1979, Chapter 12.3: "A double workload"
- ^ Press Kit, p. 8.
- ^ Mission Report, pp. A-59, inside back cover.
- ^ Science News 1969-03-22b, p. 283.
- ^ Mission Report, pp. A-1, inside back cover.
- ^ French & Burgess, pp. 338–339.
- ^ French & Burgess, p. 339.
- ^ a b Science News 1969-03-01, p. 218.
- ^ Science News 1969-03-01, p. 219.
- ^ "Lunar Module LM-2". National Air and Space Museum. Retrieved April 19, 2019.
- ^ French & Burgess, p. 340.
- ^ Carson et al 1975
- ^ Press Kit, pp. 84–85.
- ^ a b Thomas, p. 22.
- ^ Thomas, pp. 24–25.
- ^ a b Science News 1969-03-15, p. 255.
- ^ a b Mission Report, p. 1-1.
- ^ a b c d e f g h i j k l m Brooks, et al. 1979, Chapter 12.5: "Apollo 9: Earth orbital trials"
- ^ Mission Report, p. 7-1.
- ^ a b c d Mission Report, p. 3-4.
- ^ Mission Report, pp. 3-6–3-7.
- ^ a b Wilford, John Noble (March 5, 1969). "Apollo 9 proves its linkup is firm". The New York Times. pp. 1, 20.
- ^ French & Burgess, p. 343.
- ^ Chaikin, pp. 461–462.
- ^ Press Kit, pp. 3–4.
- ^ Chaikin, pp. 298–301.
- ^ French & Burgess, pp. 344–345.
- ^ Mission Report, p. 3-1.
- ^ Press Kit, pp. 4–5.
- ^ Brooks, et al. 1979, Chapter 12.4: "The mission and the men".
- ^ a b "50 years ago: Spider, Gumdrop, and Red Rover in space". NASA. March 6, 2019. Retrieved May 3, 2019.
- ^ French & Burgess, pp. 349–350.
- ^ French & Burgess, pp. 350–351.
- ^ French & Burgess, pp. 351–352.
- ^ a b French & Burgess, p. 352.
- ^ a b Science News 1969-03-22a, p. 277.
- ^ Science News 1969-03-22a, pp. 277–278.
- ^ Orloff & Harland, p. 223.
- ^ Press Kit, pp. 2, 6.
- ^ a b Nicks, Oran W., ed. (1970). This Island Earth. NASA. pp. 100–101.
- ^ Harland, p. 335.
- ^ Wilford, John Noble (March 10, 1969). "The Apollo 9 astronauts take a restful cruise through space". The New York Times. p. 40.
- ^ Press Kit, pp. 6, 22.
- ^ French & Burgess, pp. 352–353.
- ^ Press Kit, p. 22.
- ^ Mission Report, p. 7-4.
- ^ a b Press Kit, p. 7.
- ^ a b c French & Burgess, p. 353.
- ^ Mission Report, p. 1-2.
- ^ Moran, Norah (March 8, 2019). "Crew Dragon splashes down in Atlantic ending first commercial crew mission". NASA. Retrieved April 17, 2019.
- ^ "Apollo IX Command Module". San Diego Air & Space Museum. Retrieved December 13, 2018.
- ^ French, Francis (July 18, 2004). "Museum prepares Apollo 9 for display". collectSPACE. Retrieved June 1, 2019.
- ^ a b "Apollo 9". NASA Space Science Data Coordinated Archive. NASA. Retrieved April 7, 2014.
{{cite web}}: Cite has empty unknown parameter:|1=(help) - ^ Mission Report, p. 7-2.
- ^ "Saturn S-IVB-504N – Satellite Information". Satellite database. Heavens-Above. Retrieved September 23, 2013.
- ^ Chaikin, pp. 140, 144–145.
- ^ French & Burgess, pp. 354–362.
- ^ French & Burgess, p. 357.
- ^ a b French & Burgess, p. 354.
- ^ Science News 1969-03-22a, p. 278.
Bibliography
- Baker, David (1982). The History of Manned Space Flight (1st ed.). New York: Crown Publishers. ISBN 0-517-54377-X.
- Brooks, Courtney G.; Grimwood, James M.; Swenson, Loyd S., Jr. (1979). Chariots for Apollo: A History of Manned Lunar Spacecraft. The NASA History Series. Foreword by Samuel C. Phillips. Washington, D.C.: Scientific and Technical Information Branch, NASA. ISBN 978-0-486-46756-6. LCCN 79001042. OCLC 4664449. NASA SP-4205. Retrieved April 1, 2019.
{{cite book}}: CS1 maint: multiple names: authors list (link) - Carson, Maurice A.; Rouen, Michael N.; Lutz, Charles C.; McBarron, II, James W. (1975). "Extravehicular Mobility Unit". Biomedical Results of Apollo. Washington, D.C.: NASA Johnson Space Center and BioTechnology. SP-368.
- Chaikin, Andrew (1994). A Man on the Moon: The Voyages of the Apollo Astronauts. New York, NY: Viking. ISBN 978-0-670-81446-6. LCCN 93048680.
- Compton, William D. (1989). Where No Man Has Gone Before: A History of Apollo Lunar Exploration Missions. Washington, D.C.: U.S. Government Printing Office. OCLC 1045558568. SP-4214.
- Eberhart, Jonathan (March 1, 1969). "Moonward by jungle gym". Science News: 218–219. JSTOR 4548203.(subscription required)
- Ertel, Ivan D.; Newkirk, Roland W.; Brooks, Courtney G. (1975). The Apollo Spacecraft – A Chronology. Volume IV. NASA. SP-4009. Retrieved January 29, 2008.
- Ezell, Linda Neuman (1988). NASA Historical Data Book: Volume III: Programs and Projects 1969–1978. NASA History Series. SP-4012.
- French, Francis; Burgess, Colin (2010) [2007]. In the Shadow of the Moon. Lincoln, NE: University of Nebraska Press. ISBN 978-0-8032-2979-2.
- Harland, David M. (1999). Exploring the Moon: The Apollo Expeditions. Chichester, UK: Springer-Praxis. ISBN 978-1-85233-099-6.
- Apollo 9 Mission Report (PDF). Houston, TX: NASA. 1969.
- Apollo 9 Press Kit (PDF). Washington, D.C.: NASA. 1969. 69-29.
- Orloff, Richard W. (September 2004) [2000]. Apollo by the Numbers: A Statistical Reference. NASA History Series. Washington, D.C.: NASA. ISBN 978-0-16-050631-4.
- Orloff, Richard W.; Harland, David M. (2006). Apollo: The Definitive Sourcebook. Chichester, UK: Praxis Publishing Company. ISBN 978-0-387-30043-6.
- "Apollo: Healthy in mid-flight". Science News: 255. March 15, 1969. JSTOR 3954137.(subscription required)
- "Spider makes its mark". Science News: 277–278. March 22, 1969. JSTOR 3953852.(subscription required)
- "Space sciences". Science News: 283. March 22, 1969. JSTOR 3953857.(subscription required)
- Scott, David; Leonov, Alexei (2006). Two Sides of the Moon: Our Story of the Cold War Space Race (E-Book). with Christine Toomey. St. Martin's Griffin. ISBN 978-0-312-30866-7.
{{cite book}}: Cite has empty unknown parameter:|1=(help) - Thomas, Kenneth S. "The Apollo Portable Life Support System" (pdf). Apollo Lunar Surface Journal.
{{cite web}}: CS1 maint: ref duplicates default (link)
External links
NASA reports
- "Apollo 9 flight plan AS-504/CSM-104/LM-3 Final Report" (PDF) by J. V. Rivers, NASA, February 1969
- "Apollo Program Summary Report" (PDF), NASA, JSC-09423, April 1975
Multimedia
- Apollo 9: Three To Make Ready Official NASA documentary film (1969)
- Apollo 9 16mm onboard film part 1, part 2 raw footage taken from Apollo 9
- Apollo 9: The Space Duet of Spider & Gumdrop Official NASA documentary film (1969), OCLC 7682161
- Apollo 9 images at NASA'S Kennedy Space Center
| Launch complexes |  | ||||||||||
|---|---|---|---|---|---|---|---|---|---|---|---|
| Ground facilities | |||||||||||
| Launch vehicles | |||||||||||
| Spacecraft and rover | |||||||||||
| Flights |
| ||||||||||
| Apollo 8 specific | |||||||||||
| Apollo 11 specific | |||||||||||
| Apollo 12 specific | |||||||||||
| Apollo 13 specific | |||||||||||
| Apollo 14 specific | |||||||||||
| Apollo 15 specific | |||||||||||
| Apollo 16 specific | |||||||||||
| Apollo 17 specific | |||||||||||
| Post-Apollo capsule use | |||||||||||
| Related | |||||||||||
| |||||||||||